In today's modern homes, flooring choices play a crucial role in both aesthetics and functionality. Luxury Vinyl Plank (LVP) flooring has emerged as a game-changer in the flooring industry, offering the perfect blend of style, durability, and affordability. This comprehensive guide explores why LVP flooring has become the preferred choice for homeowners and interior designers alike.
Whether you're renovating your home or building new, understanding the benefits and considerations of LVP flooring is crucial for making an informed decision. From its waterproof properties to its stunning visual appeal, LVP flooring offers numerous advantages that make it stand out in the competitive flooring market.
What is Luxury Vinyl Plank Flooring?
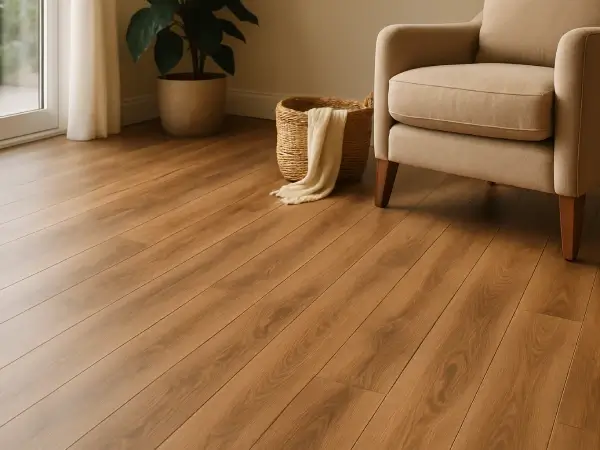
Luxury Vinyl Plank flooring is a premium flooring solution that combines the natural beauty of hardwood with the durability of vinyl. It consists of multiple layers:
- Wear layer for protection
- Design layer with realistic wood patterns
- Core layer for stability
- Backing layer for moisture resistance
The manufacturing process of LVP flooring involves advanced technology that creates incredibly realistic wood grain patterns and textures. Each plank is carefully crafted to mimic the natural variations found in hardwood, while providing superior durability and moisture resistance.
Ready to Plan Your LVP Flooring Project?
Use our flooring calculator to get precise measurements and cost estimates for your space. Whether you're renovating a single room or your entire home, our calculator helps you make informed decisions about your flooring investment. Get accurate calculations for material quantities, waste factors, and total project costs.
Top 10 Benefits of LVP Flooring
1. Waterproof Properties
Unlike traditional hardwood, LVP flooring is completely waterproof, making it ideal for bathrooms, kitchens, and basements. The waterproof core prevents water damage and warping, even in high-moisture environments. This feature makes LVP an excellent choice for:
- Bathrooms and laundry rooms
- Kitchens and dining areas
- Basements and below-grade installations
- Mudrooms and entryways
2. Durability and Longevity
With proper maintenance, LVP flooring can last 15-25 years, resisting scratches, dents, and wear from daily use. The wear layer, typically ranging from 6 to 20 mils in thickness, provides exceptional protection against:
- Foot traffic and furniture movement
- Pet claws and children's activities
- UV light exposure
- General wear and tear
3. Easy Installation
Most LVP flooring features a click-lock system, allowing for straightforward installation over most existing floors. The installation process typically involves:
- Minimal subfloor preparation
- No need for adhesives or special tools
- Floating floor installation method
- Quick and clean installation process
4. Cost-Effective
LVP flooring offers premium looks at a fraction of the cost of hardwood, with prices typically ranging from $2.50 to $7 per square foot. When compared to other flooring options:
- Hardwood: $8-$15 per square foot
- Engineered Wood: $4-$10 per square foot
- Ceramic Tile: $5-$10 per square foot
- Natural Stone: $10-$20 per square foot
Use our Flooring Calculator to estimate the exact cost for your space, including material and installation costs.
5. Low Maintenance
Regular sweeping and occasional mopping are all that's needed to keep LVP flooring looking its best. The maintenance routine includes:
- Daily sweeping or vacuuming
- Weekly damp mopping with manufacturer-approved cleaner
- Immediate cleanup of spills
- Regular inspection for damage
6. Comfort Underfoot
The multi-layer construction provides excellent sound absorption and a comfortable walking surface. Additional benefits include:
- Reduced noise transmission between floors
- Softer feel compared to tile or stone
- Better temperature retention than hardwood
- Reduced foot fatigue
7. Versatile Design Options
Available in countless styles, colors, and patterns, LVP can complement any interior design scheme. Popular options include:
- Traditional oak and maple looks
- Exotic wood species like teak and mahogany
- Rustic and distressed finishes
- Modern gray and white-washed tones
8. Environmentally Friendly
Many LVP products are made with recycled materials and are recyclable at the end of their lifespan. Environmental benefits include:
- Reduced deforestation compared to hardwood
- Lower carbon footprint in manufacturing
- Recyclable materials
- Longer lifespan reducing replacement frequency
9. Pet-Friendly
Resistant to scratches and accidents, LVP is an excellent choice for homes with pets. Key features for pet owners include:
- Scratch-resistant surface
- Easy cleanup of pet accidents
- Slip-resistant texture
- Durable enough for active pets
10. Temperature Stability
LVP flooring maintains its shape and appearance in various temperature conditions. This stability is achieved through:
- Advanced core technology
- Resistance to temperature fluctuations
- Minimal expansion and contraction
- Compatibility with radiant heating systems
Installation Tips and Best Practices
Proper installation is crucial for maximizing the benefits of LVP flooring. Follow these detailed steps for a successful installation:
Required Tools and Materials
- Luxury vinyl plank flooring
- Underlayment
- Spacers
- Transition strips
- Flooring adhesive (if needed)
- Utility knife
- Tape measure
- Rubber mallet
- Pull bar
- Circular saw or jigsaw
- Safety glasses
- Knee pads
Step-by-Step Installation Guide
1. Prepare the Subfloor
Remove existing flooring, clean the subfloor thoroughly, and ensure it's dry and level. Fill any cracks or holes with leveling compound if necessary. A properly prepared subfloor is essential for a successful installation.
2. Acclimate the Flooring
Allow the LVP planks to acclimate to room temperature for 48 hours before installation. Keep them in their original packaging during this time. This step helps prevent expansion and contraction issues after installation.
3. Install Underlayment
Roll out the underlayment across the entire floor, overlapping seams by 2-3 inches (5-8 cm). Secure with tape if necessary. The underlayment provides moisture protection and sound reduction.
4. Plan the Layout
Measure the room and plan the layout to ensure balanced plank distribution. Start from the longest wall and work towards the door. This planning step helps minimize waste and ensures a professional appearance.
5. Install the First Row
Place spacers against the wall and install the first row of planks, ensuring the tongue side faces the wall. Use a rubber mallet to secure the joints. The first row sets the foundation for the entire installation.
6. Continue Installation
Continue installing planks row by row, staggering the joints by at least 6 inches (15 cm). Use a pull bar to secure the last plank in each row. This staggering pattern creates a more natural look and improves stability.
7. Cut and Fit Around Obstacles
Measure and cut planks to fit around doorways, vents, and other obstacles. Use a utility knife or saw for precise cuts. Take your time with these cuts to ensure a professional finish.
8. Install Transition Strips
Install transition strips at doorways and where the LVP meets other flooring types. Secure them according to manufacturer instructions. These strips provide a clean transition between different flooring surfaces.
9. Final Inspection and Cleanup
Remove spacers, inspect the installation for any gaps or issues, and clean the floor thoroughly. Allow 24 hours before heavy furniture placement. This waiting period ensures the flooring has properly settled.
Pro Tips for Success
- Always wear safety glasses and knee pads during installation
- Keep extra planks for future repairs
- Work in a well-lit area for better visibility
- Take breaks to prevent fatigue and ensure accuracy
- Follow manufacturer's specific instructions for your LVP product
Before starting your installation, use our Flooring Calculator to determine the exact amount of material needed, including waste factor for cuts and mistakes.
Maintenance Guide
Keep your LVP flooring looking beautiful with these maintenance tips:
- Regular sweeping or vacuuming
- Use manufacturer-recommended cleaning products
- Avoid excessive water during cleaning
- Use furniture pads to prevent scratches
For optimal maintenance, follow these additional guidelines:
- Clean spills immediately to prevent staining
- Use doormats at entrances to reduce dirt and debris
- Trim pet nails regularly to prevent scratches
- Schedule professional cleaning annually
Cost Analysis and ROI
When considering LVP flooring, it's important to factor in:
- Material costs ($2.50-$7 per square foot)
- Installation costs ($2-$5 per square foot)
- Long-term maintenance savings
- Increased home value
To get an accurate estimate for your specific project, use our Flooring Calculator. The calculator will help you determine:
- Total square footage needed
- Material costs based on your chosen LVP product
- Installation costs in your area
- Total project budget
Frequently Asked Questions
What is LVP flooring?
Luxury Vinyl Plank (LVP) is a durable, water-resistant flooring option that mimics the look of hardwood. It consists of multiple layers including a wear layer, design layer, and core layer, making it perfect for high-traffic areas and moisture-prone spaces.
How long does LVP flooring last?
With proper installation and maintenance, LVP flooring can last 15-25 years. The lifespan depends on the quality of the product, wear layer thickness (typically 6-20 mils or 0.15-0.5 mm), and how well it's maintained.
Can LVP flooring be installed over existing floors?
Yes, LVP flooring can be installed over most existing floors, including concrete, plywood, and even existing vinyl. However, the subfloor must be clean, dry, and level for proper installation.
How do I calculate how much LVP flooring I need?
Use our Flooring Calculator to determine the exact amount of LVP flooring needed for your space. The calculator accounts for room dimensions, waste factor, and installation method to give you an accurate estimate.
Conclusion
Luxury Vinyl Plank flooring offers an unbeatable combination of style, durability, and value for modern homeowners. Whether you're renovating your home or building new, LVP flooring provides a practical and beautiful solution that stands the test of time.
Ready to start your LVP flooring project? Use our Flooring Calculator to get an accurate estimate of materials and costs for your space. The calculator will help you plan your budget and ensure you purchase the right amount of flooring for your project.
Ready to Transform Your Home?
Use our Flooring Calculator to estimate the cost of your LVP flooring project and get started today!
Calculate Your Flooring Costs